BLOGS
How to Fix Water-Damaged Drywall: A Step-by-Step Guide
"Fixing water-damaged drywall restores more than just the surface; it protects your home from further harm."
Water damage is a common household issue that can wreak havoc on your home’s structural integrity and aesthetic appeal. One of the most common areas affected by water damage is drywall. If you’ve noticed that your drywall is damp, swollen, or discolored, it’s crucial to address the issue quickly to prevent further damage, mold growth, and costly repairs.
In this step-by-step guide, we’ll walk you through the process of fixing water-damaged drywall, from assessing the damage to applying the final coat of paint. Whether you're a seasoned DIYer or a first-time homeowner, these instructions will help you restore your walls to their original condition.
Step 1: Assess the Damage
Before you begin repairs, it’s important to assess the extent of the water damage. Water can cause different types of damage, such as:
Damp or Wet Drywall: A small amount of moisture can usually be dried out with fans and dehumidifiers.
Swollen or Soft Drywall: If the drywall has become soft or swollen, it's a sign that it may need to be replaced.
Discolored or Stained Drywall: If the drywall has visible stains or marks, it may indicate water penetration and the need for patching.
Mold Growth: Mold can begin growing on wet drywall within 24–48 hours. If you see mold, it’s crucial to take action immediately.
Pro Tip:
If the water damage is from a leaking pipe or ceiling, stop the water source before proceeding with repairs. Otherwise, the damage will likely continue to worsen.

Step 2: Gather Your Materials and Tools
Before starting the repair, make sure you have all the necessary materials and tools on hand. Here’s a list of what you’ll need:
Materials:
Joint compound or spackle
Drywall patch (if needed)
Mold-resistant primer (if mold is present)
Paint and paintbrush/roller
Drywall tape (paper or fiberglass mesh)
Replacement drywall (if the damage is extensive)
Tools:
Utility knife or drywall saw
Screwdriver
Putty knife or drywall knife
Sanding block or drywall sander
Measuring tape
Protective gloves and mask
Drop cloths or plastic sheeting (for floor protection)
Step 3: Remove the Water-Damaged Drywall
If the water damage is extensive and the drywall has become soft, stained, or swollen, it may need to be cut out and replaced. Follow these steps:
Mark the Damaged Area: Use a pencil or chalk to outline the damaged section of drywall. Make sure to cut at least an inch beyond the damaged area to ensure you’re removing all the affected material.
Cut the Drywall: Using a utility knife or drywall saw, carefully cut along the marks you’ve made. If the damage is near studs or wiring, be sure to cut carefully to avoid hitting anything inside the wall.
Remove the Damaged Section: Once the drywall is cut, gently pull the damaged piece away from the studs. Use a screwdriver to unscrew any nails or screws that were holding the drywall in place.
Tip:
If there is mold or mildew present, be sure to wear a mask and gloves to avoid inhaling spores or coming into direct contact with the mold.
Step 4: Address the Water Source
Before proceeding with the repairs, you must identify and fix the source of the water damage. This could involve:
Repairing Leaking Pipes: If the damage was caused by a broken pipe, make sure to call a plumber to fix it.
Fixing Roof Leaks: If the issue was caused by a roof leak, you’ll need to repair or replace damaged shingles.
Sealing Windows or Doors: Ensure that any gaps around windows or doors that could allow water to seep in are sealed properly.
Once the water source is fixed, let the area dry out completely. Use fans or a dehumidifier to speed up the drying process, which can take several days.
Step 5: Replace the Damaged Drywall
Once the area is dry and the water source has been fixed, it’s time to replace the damaged drywall. If the damage was localized, you can cut a new drywall patch to fit the hole. Here’s how:
Measure and Cut the New Drywall: Measure the hole left by the damaged drywall and cut a new piece of drywall to fit. Use a utility knife to score and snap the drywall to the desired size.
Install the New Drywall: Position the new drywall piece into place and screw it into the studs with drywall screws. Make sure the drywall is flush with the surrounding surface.
Tape the Seams: Apply drywall tape over the seams where the new drywall meets the existing wall. Use a joint compound to cover the tape and smooth the surface.
Tip:
For larger holes, you may need to use a piece of wood or a drywall repair clip to help hold the drywall patch in place.
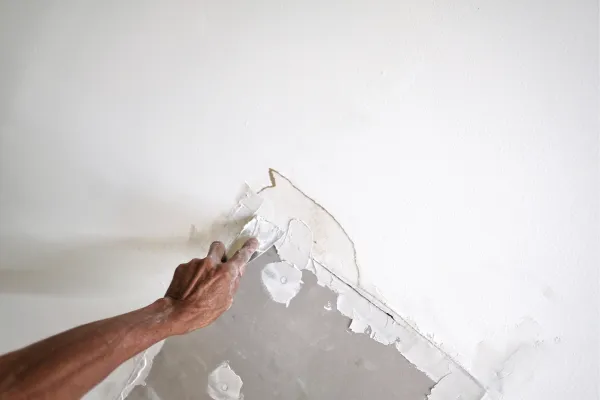
Step 6: Apply Joint Compound and Sand
After the drywall is in place, you’ll need to apply joint compound (also known as drywall mud) to cover the seams and screw holes.
Apply the First Coat of Joint Compound: Use a putty knife or drywall knife to apply a thin layer of joint compound over the taped seams and screw holes. Smooth it out as much as possible to minimize sanding later.
Let the Compound Dry: Allow the first coat to dry completely (this may take a few hours). Once dry, lightly sand the surface with a drywall sanding block or a fine-grit sander.
Apply Additional Coats: Apply a second and third coat of joint compound, if needed, allowing each coat to dry and sanding between layers. The more coats you apply, the smoother the surface will be.
Step 7: Prime and Paint
Once the compound is dry and smooth, it’s time to finish the repair with primer and paint.
Apply a Mold-Resistant Primer: If there was any mold or mildew present, apply a mold-resistant primer to the patched area before painting. This will help prevent future mold growth.
Paint the Drywall: Once the primer is dry, apply the paint of your choice. You may need two coats for an even finish. Be sure to use a paint that matches the existing wall color or choose a fresh color for the area.
Step 8: Clean Up and Inspect
After the paint has dried, it’s time to clean up your work area. Remove any protective coverings, dispose of old drywall, and wipe down tools. Inspect the repaired area to ensure it blends seamlessly with the surrounding wall. If the repair is seamless, your drywall is as good as new!
Final Thoughts
Fixing water-damaged drywall is a manageable DIY project that can save you a significant amount of money. By carefully assessing the damage, replacing the affected drywall, and taking steps to prevent future water damage, you can restore the appearance and integrity of your walls.
Always remember to address the water source first, and take the necessary precautions, such as wearing gloves and a mask, when dealing with mold or mildew. With a little patience and the right tools, you’ll have your drywall looking fresh and new in no time!