BLOGS
DIY Drywall Repair: What You Need to Know Before You Start
"With the right tools, a little patience, and some know-how, DIY drywall repair can transform any wall from damaged to flawless, saving you time and money."
Whether it’s a small hole from a door knob, a water stain, or the wear and tear of daily life, drywall can easily get damaged. Luckily, repairing drywall is a relatively straightforward DIY task that can save you money and restore your walls to their original condition. If you’ve never tackled a drywall repair before, don’t worry. With the right tools, materials, and a bit of patience, you’ll be able to handle most drywall issues with ease.
In this blog, we’ll walk you through everything you need to know before starting a DIY drywall repair project, from gathering the right tools to step-by-step instructions for fixing common drywall problems.
Why DIY Drywall Repair?
Repairing drywall on your own can be a rewarding experience. Not only does it save you money on professional labor, but it also gives you the satisfaction of completing a home improvement project. With a few simple steps, you can restore the damaged drywall, making your home look fresh again.

Common Drywall Damage and How to Fix It
Before we dive into the tools and techniques, it’s important to know the types of drywall damage you might encounter. These are the most common issues homeowners face:
1. Small Holes and Dents
These are typically caused by nails, screws, or accidental bumps. They’re easy to repair and only require minimal materials.
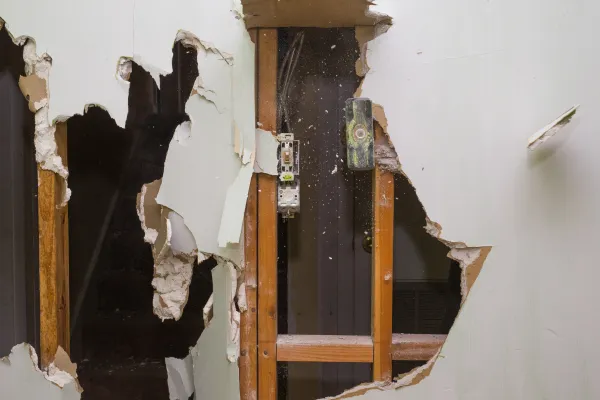
2. Large Holes
Large holes can occur from moving furniture, mishandling objects, or even as a result of water damage. These will need a bit more work, such as cutting out the damaged area and replacing it with new drywall.
3. Cracks
Cracks in drywall often appear as a result of settling homes, temperature changes, or moisture. These cracks are relatively easy to repair but may require special attention depending on the cause.
4. Water Damage
Water damage can cause drywall to swell, stain, or crumble. It’s important to not only repair the drywall but also fix the source of the leak to prevent further damage.
Tools and Materials You’ll Need
Before you start your drywall repair, make sure you have the right tools and materials to ensure the job goes smoothly. Here’s a list of what you’ll need:
Tools:
Utility knife
Drywall saw or keyhole saw
Putty knife or drywall knife
Drywall sander or sanding block
Paintbrush or roller (for finishing)
Measuring tape
Stud finder (for larger repairs)
Materials:
Joint compound (drywall mud)
Drywall patch or new drywall sheet (for larger holes)
Drywall tape (paper or mesh)
Primer and paint
Drywall screws or nails (for securing new drywall)
Spackle or patching paste (for small holes)
Step-by-Step Guide to DIY Drywall Repair
Now that you have your tools ready, let’s go through the process of repairing drywall step by step. We’ll cover both small and large repairs.
1. Repairing Small Holes and Dents
Small holes (less than 1/2 inch in diameter) are the easiest to repair. Here’s how you do it:
Clean the Hole: Use a utility knife to clean the edges of the hole or dent, removing any jagged or loose pieces of drywall.
Apply Spackle: Use a putty knife to apply a layer of spackle or joint compound over the hole. Smooth it out so the surface is even with the surrounding wall.
Let It Dry: Allow the compound to dry completely, following the manufacturer’s instructions for drying times.
Sand and Smooth: Once the compound is dry, lightly sand the area with a sanding block or drywall sander to smooth it out.
Prime and Paint: Apply a coat of primer to the repaired area, then paint to match the surrounding wall.
2. Repairing Larger Holes
For larger holes (greater than 1/2 inch), you'll need to cut out the damaged drywall and replace it. Here’s how to do it:
Cut Around the Damaged Area: Use a utility knife or drywall saw to cut out a square or rectangular shape around the hole. Be sure to cut along the studs if possible, as this will give you a more secure base for the new drywall.
Measure and Cut the Replacement Piece: Measure the hole and cut a new piece of drywall to fit. Be sure the piece is slightly smaller than the hole to fit comfortably inside.
Install the Patch: Secure the new drywall piece into place using drywall screws or nails. Make sure the edges are flush with the surrounding wall.
Tape the Seams: Apply drywall tape along the seams where the new drywall meets the existing wall.
Apply Joint Compound: Spread a thin layer of joint compound over the tape and screws. Use a drywall knife to smooth it out.
Let It Dry and Sand: Allow the compound to dry, then sand the area to remove any bumps.
Repeat the Mudding Process: Apply two or three more layers of joint compound, letting each layer dry and sanding it smooth. Feather the edges of the compound so it blends seamlessly into the wall.
Prime and Paint: Once the compound is smooth and dry, apply primer and paint to match the rest of the wall.
3. Repairing Cracks
Cracks in drywall can often be fixed quickly with joint compound. Here’s how to repair them:
Prepare the Area: Use a utility knife to widen the crack slightly and remove any loose material.
Apply Joint Compound: Use a putty knife to spread a thin layer of joint compound over the crack, filling it completely.
Smooth and Feather: Smooth out the compound so it’s level with the wall. Feather the edges of the compound to blend it into the surrounding surface.
Let It Dry and Sand: Let the compound dry, then sand it smooth. Apply additional coats of compound as needed, allowing each layer to dry before sanding.
Prime and Paint: Once the crack is fully repaired, apply primer and paint.
4. Repairing Water-Damaged Drywall
Water damage requires a bit more attention. You’ll need to fix the underlying leak and allow the drywall to fully dry before proceeding with repairs:
Fix the Leak: If the water damage is from a leaking pipe or roof, fix the source of the leak first to prevent further damage.
Cut Out Damaged Drywall: If the drywall has swollen or crumbled, cut out the damaged sections with a utility knife.
Let the Area Dry: Use fans or a dehumidifier to dry the area completely before proceeding with repairs.
Install New Drywall: Once the area is dry, follow the steps for repairing larger holes to replace the damaged drywall.
Apply Joint Compound and Finish: Once the new drywall is in place, apply joint compound, sand, and paint as described earlier.
Tips for a Successful DIY Drywall Repair
Take Your Time: Drywall repair requires patience. Don’t rush the process, especially the drying times between coats of joint compound.
Use the Right Tools: Invest in quality tools, especially for sanding and applying joint compound, for a smoother finish.
Wear a Dust Mask: Drywall dust can be harmful, so always wear a dust mask when sanding.
Test Your Paint Color: Before painting the entire wall, test your paint color on a small area to ensure it matches the surrounding wall.
Final Thoughts
DIY drywall repair is an excellent way to maintain the integrity of your home without the expense of hiring a professional. With the right tools, materials, and techniques, you can easily tackle most drywall issues yourself. Whether you’re fixing small holes or large patches, taking the time to do it right will ensure a smooth and professional-looking result.
So, the next time you encounter a drywall problem, don’t hesitate to grab your tools and get started. Happy repairing!